> ## Documentation Index
> Fetch the complete documentation index at: https://docs.anlytic.com/llms.txt
> Use this file to discover all available pages before exploring further.
# Workspace filters
Workspace Filters allow you to define reusable filtering logic that can be applied across dashboards, workbooks, and team environments. Filters can include multiple groups and fields, and support different input types such as text input, radio selection, or dropdown lists.
This section explains how to create a new workspace filter using groups, fields, and multi-level configurations.
## Add Filters – Screen Overview
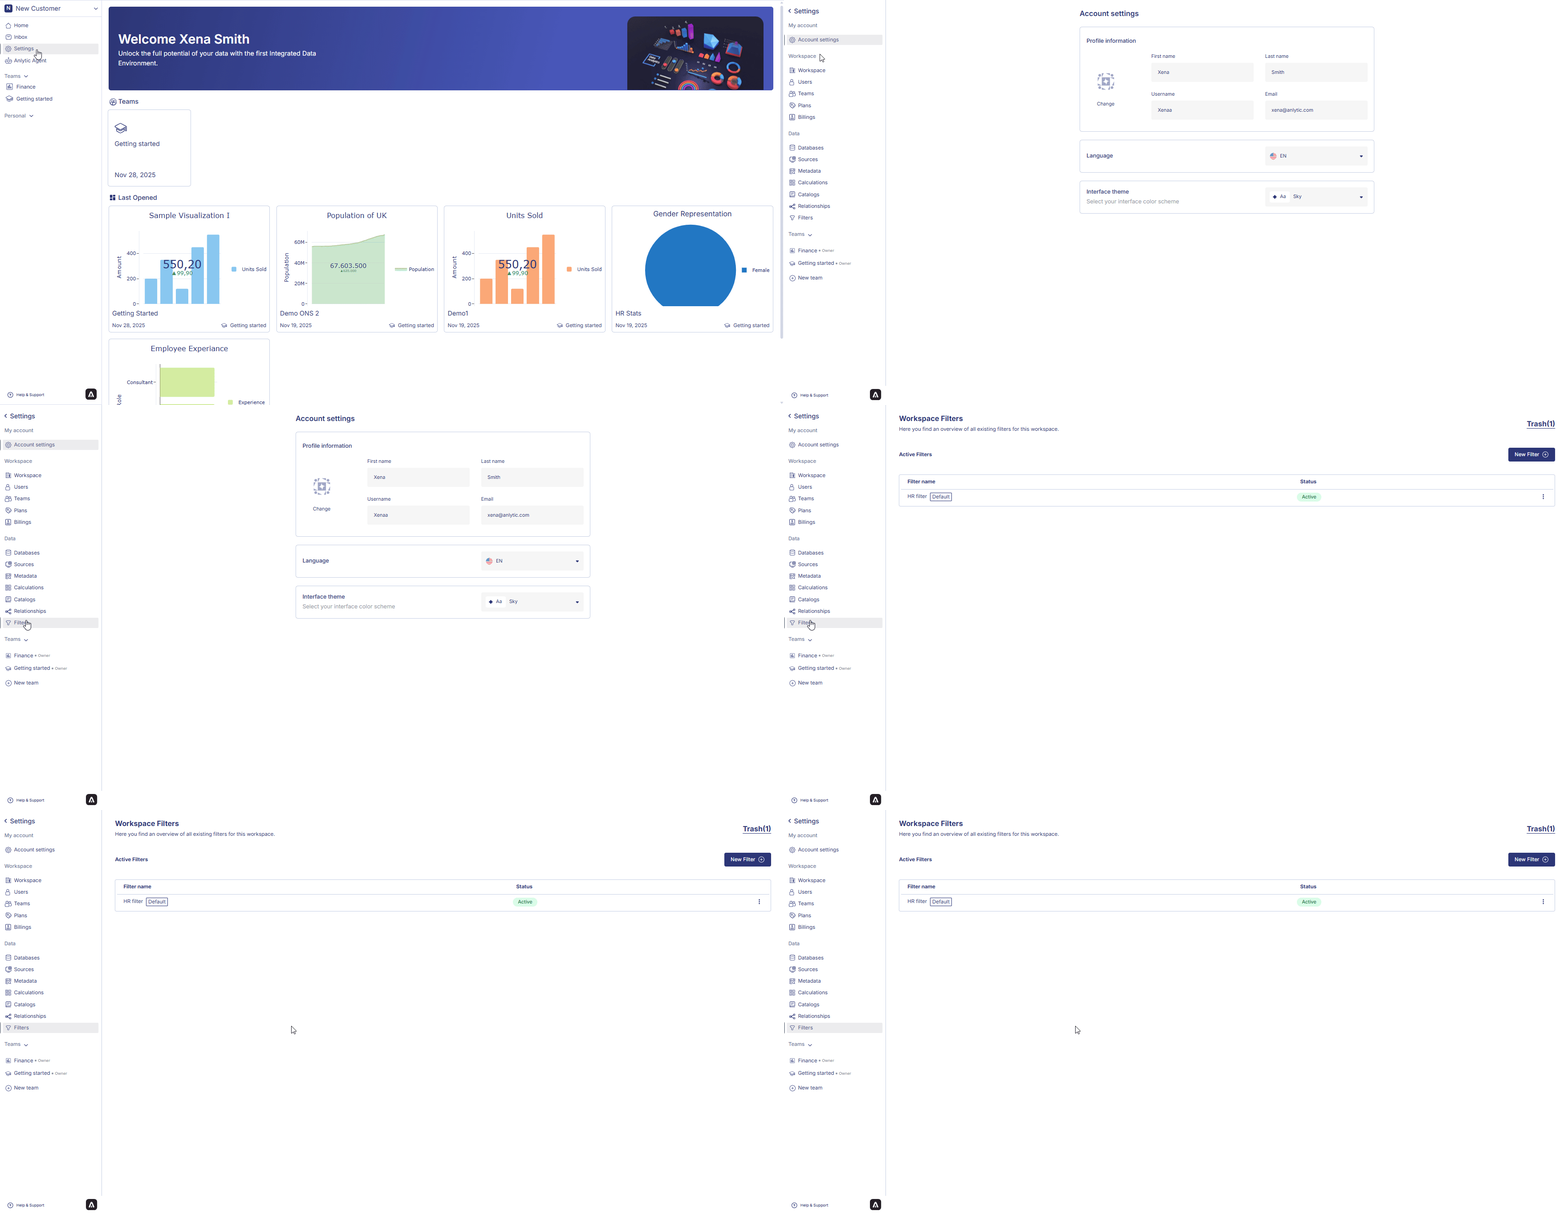
Before creating a filter, you must first navigate to the Filters configuration screen.
Click on the **name of the workspace**.\
Click **Settings**.\
From the left-hand sidebar, click **Filters** to access the configuration area where filters are created.
When creating a filter, you will see the **Add Filters** screen, containing:
* Filter Name
* Groups and Fields
* Add group button
* Add field button
* Preview panel
* Deploy button\
Each filter can contain multiple groups or fields depending on your filtering requirements.
 ## 1. Create a Filter Name
At the top-right of the screen, enter a meaningful name for your filter.\
Using descriptive names helps users understand where and how the filter is used.
## 2. Add a Group
Groups help organize filters into logical sections. Each group can contain multiple levels and fields.
### 2.1 Add a Group
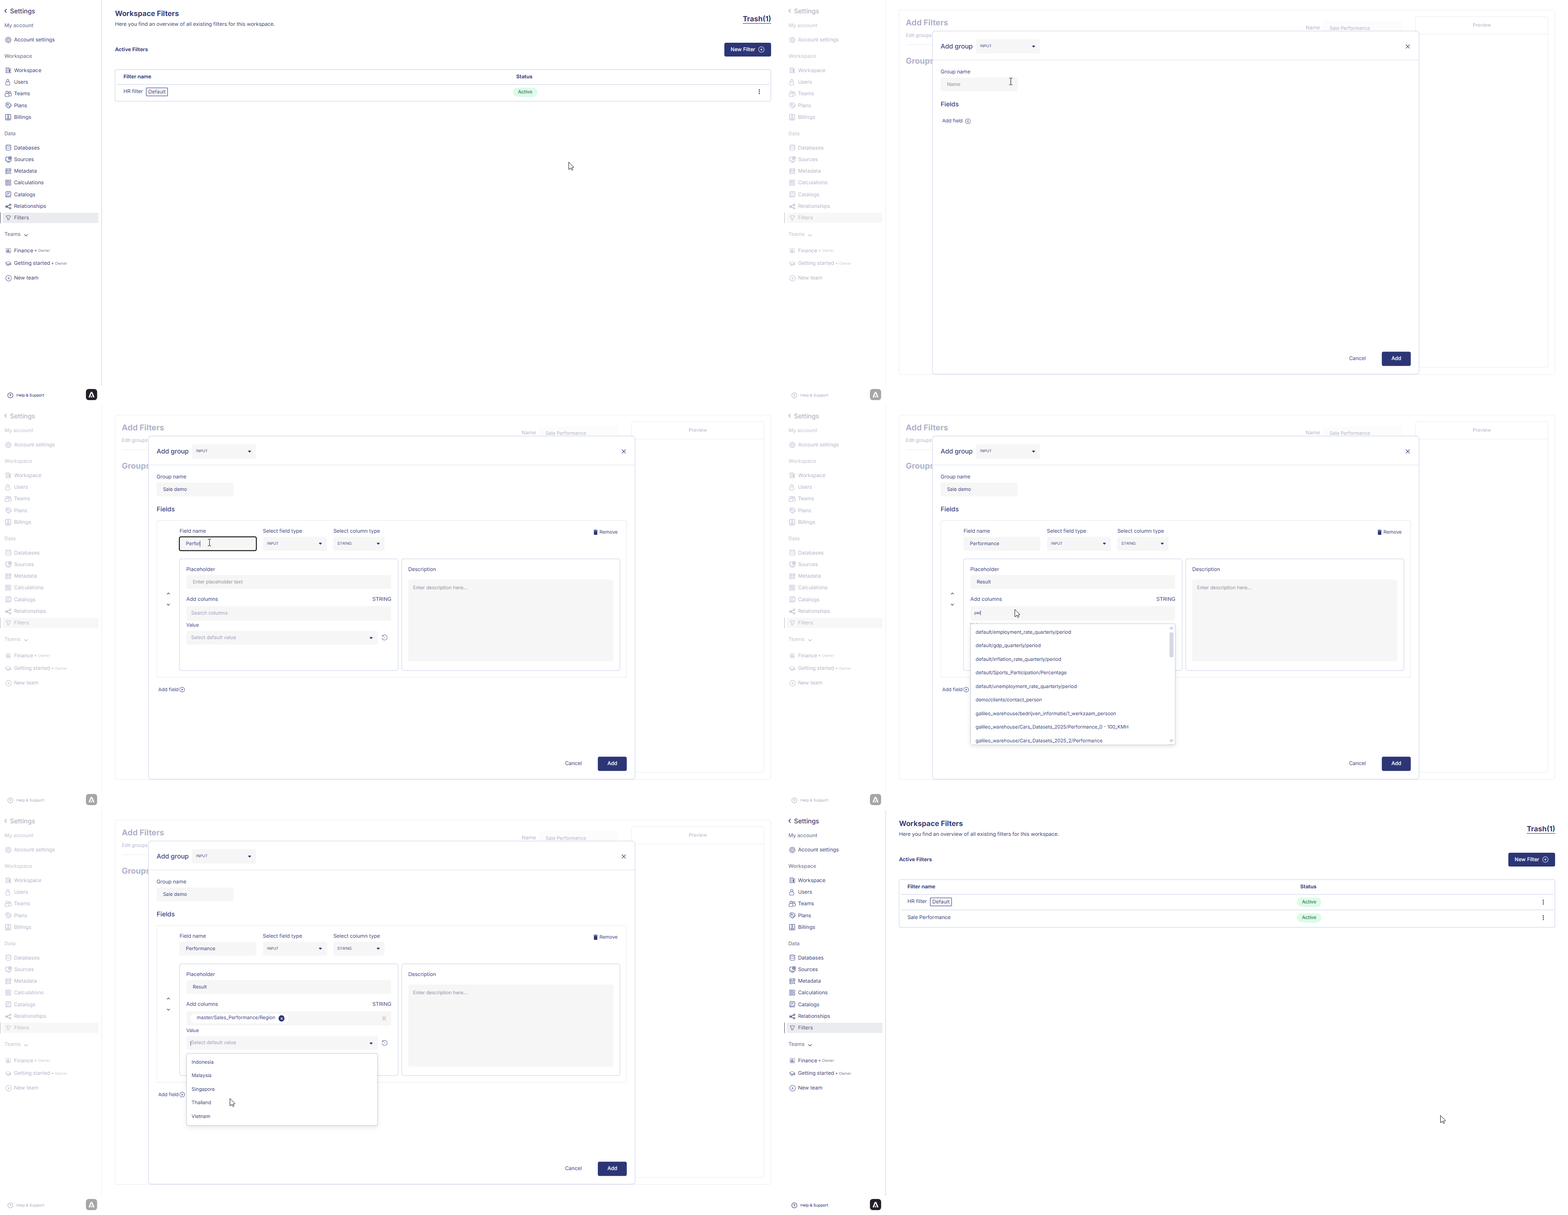
1. Click **Add group**.
2. A new **Add group** panel appears.
3. Select a **Group Type** from the dropdown.
#### Group Type Options
| Option | Description |
| ------ | --------------------------------------------- |
| INP | Standard text input field |
| INPUT | Generic input field (text/number) |
| RADIO | Radio button selection with predefined values |
### 2.2 Enter Group Name
Provide a clear group name, for example:
* Category
* Department Selector
* Product Level
* Region Group
This name will appear as the group title inside the filter.
## 3. Configure Fields Within a Group
Each group contains **Fields**, which may include multiple levels (Category, Level 01, Level 02,…).
### 3.1 Category Section
Each Category section includes:
* Placeholder
* Add columns (choose column from your catalog)
* Value (default or selectable values)
* Description (explanation of how the field is used)
### Example inputs
| Field | Example |
| ----------- | -------------------------- |
| Placeholder | “Enter category…” |
| Add columns | product\_category |
| Value | Electronics, Furniture |
| Description | Filter by product category |
### 3.2 Level 01, Level 02, Level 03…
You can add additional levels if your filter requires hierarchical filtering (e.g., Region → Country → City).
### 3.3 Add Level or Field to the Group
After entering all necessary information:
* Click **Add** in the Group panel
* The group appears under **Groups and fields**
## 4. Add a Field (Without Group)
If you do not want to create a group, you can add a standalone field.
### 4.1 Add Field
1. Click **Add field**.
2. Select a **Field Type** (INP / INPUT / RADIO / other types).
3. Enter field details:
#### Field Details
| Field | Description |
| ------------------ | ------------------------------------------------- |
| Field name | Display name for the filter |
| Select column type | Choose field type (String, Number, Boolean, etc.) |
| Placeholder | Text shown when field is empty |
| Add columns | Link to a source column |
| Value | Default or fixed values |
Click **Add** to save.
## 5. Preview the Filter
The right-side **Preview** panel displays a real-time representation of your filter.\
You can check:
* Group and level structure
* Field nesting
* Input types
* Default values
This helps verify filter configuration before deployment.
## 6. Deploy the Filter
Once your filter is ready:
1. Review the configuration
2. Click **Deploy**
3. The filter appears under **Workspace Filters** with status **Active**
You can:
* Edit a filter
* Set as Default
* Delete a filter (sent to Trash)
* Restore deleted filters
## 1. Create a Filter Name
At the top-right of the screen, enter a meaningful name for your filter.\
Using descriptive names helps users understand where and how the filter is used.
## 2. Add a Group
Groups help organize filters into logical sections. Each group can contain multiple levels and fields.
### 2.1 Add a Group
1. Click **Add group**.
2. A new **Add group** panel appears.
3. Select a **Group Type** from the dropdown.
#### Group Type Options
| Option | Description |
| ------ | --------------------------------------------- |
| INP | Standard text input field |
| INPUT | Generic input field (text/number) |
| RADIO | Radio button selection with predefined values |
### 2.2 Enter Group Name
Provide a clear group name, for example:
* Category
* Department Selector
* Product Level
* Region Group
This name will appear as the group title inside the filter.
## 3. Configure Fields Within a Group
Each group contains **Fields**, which may include multiple levels (Category, Level 01, Level 02,…).
### 3.1 Category Section
Each Category section includes:
* Placeholder
* Add columns (choose column from your catalog)
* Value (default or selectable values)
* Description (explanation of how the field is used)
### Example inputs
| Field | Example |
| ----------- | -------------------------- |
| Placeholder | “Enter category…” |
| Add columns | product\_category |
| Value | Electronics, Furniture |
| Description | Filter by product category |
### 3.2 Level 01, Level 02, Level 03…
You can add additional levels if your filter requires hierarchical filtering (e.g., Region → Country → City).
### 3.3 Add Level or Field to the Group
After entering all necessary information:
* Click **Add** in the Group panel
* The group appears under **Groups and fields**
## 4. Add a Field (Without Group)
If you do not want to create a group, you can add a standalone field.
### 4.1 Add Field
1. Click **Add field**.
2. Select a **Field Type** (INP / INPUT / RADIO / other types).
3. Enter field details:
#### Field Details
| Field | Description |
| ------------------ | ------------------------------------------------- |
| Field name | Display name for the filter |
| Select column type | Choose field type (String, Number, Boolean, etc.) |
| Placeholder | Text shown when field is empty |
| Add columns | Link to a source column |
| Value | Default or fixed values |
Click **Add** to save.
## 5. Preview the Filter
The right-side **Preview** panel displays a real-time representation of your filter.\
You can check:
* Group and level structure
* Field nesting
* Input types
* Default values
This helps verify filter configuration before deployment.
## 6. Deploy the Filter
Once your filter is ready:
1. Review the configuration
2. Click **Deploy**
3. The filter appears under **Workspace Filters** with status **Active**
You can:
* Edit a filter
* Set as Default
* Delete a filter (sent to Trash)
* Restore deleted filters
 This ensures consistent and standardized filtering logic across your workspace.